Showing posts with label sewing. Show all posts

Tuesday, July 10, 2012

New wipes

Matthew uses cloth diapers, so we also use cloth wipes. After a year of use, they can get really ratty. So I dug around for somthing to replace them with.  Happily I found just the flannel in my fabric stash. As it is I LOVE the cloth wipes.  And I have saved $5 a week for a year ($260) by simply washing the wipes with Matt's clothes.  Best idea ever. even if Matt is using  disposable diapers, I STILL use the cloth wipes. The wipes simply clean him better.

A very big thank you to my mother - in - law for the use of her pinking rotary cutter! It made a hard job easy.  the last wipes I had to cut by hand with a pair of pinking shears. My hand hurt for two weeks.

this made a whole container of wipes :)

Wednesday, June 27, 2012

Cloth Pull Ups

 Matt has been showing an interest in the potty and we have had a potty chair in the bathroom for quite some time.  Matt has even used it. i can tell since he stays dry for quite a while then floods over his diaper that i know hes "holding" so it wont be long.  hopefully as soon as we can get him walking we can think about starting this potty training thing.

So, I have been trying to figure out what we were going to do for pull ups.  I LOVE my cloth diapers and the comfort in knowing i never have to worry about running out. But pull ups are SOOO nice for potty training. 

I looked around on Pinterest and i found this... http://paxye.com/blog/one-wet-trainers-for-ec-tutorial/ BUT i sincerely do not have time to MAKE underwear!  SOOOO i went back to the drawing board....

20 years ago my daughter had training pants so i started hunting around for the same thing. and at Walmart I found a pack of three for under $8. the problem i had with them were they weren't water proof, the TINIEST  accident was a whole outfit change.

So i didn't really want to do that again, BUT I thought if i had some PLU fabric like what his diapers are made of maybe i could MAKE them some what waterproof, kind of like a poise panty liner but not like a diaper.

PLU 1/4 yard $3.50 Training pants $8 

well at hobby lobby I FOUND the PLU for 12.99/yard I only got 1/4 of a yard. it was only $3.50 for it. if you don't know what PLU is, PUL is a polyester/polyurethane laminate. nice flexible fabric that is waterproof on the inside, in a nutshell great stuff -- not your momma's plastic pants!


making the pattern

So after picking up the PLU and the training pants I got started!  First i ahd to make a pattern.  i pinned a piece of paper to the under pants i trimmed the shape out that i needed for the liner.

then i used a zig zag stitch real tight (like an applique) to fasten PLU to the training pants. the training pants already have padding in the crotch, so i didn't need to add any of that.

they wont be 100% but i think they will be just fine for at home. We can use paper pull ups for outings and bedtime like we do with disposable diapers now.


finished pants

Thursday, March 1, 2012

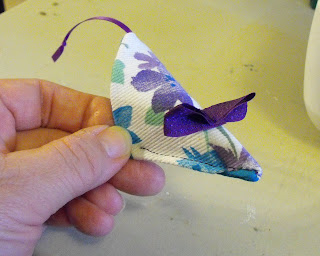
Crinkle Mouse Cat Toy tutorial

I made this crinkle mouse for a craft fair i have coming up, and i thought he was SO cute so i decided to share how to do it with you.


These squares are about 3 inches square the white fabric which will be the outside of the mouse is a canvas type of material. the blue is a simple cheap cotton. and as you can tell, the third is a wrapper from a ramen pride noodle. it makes a nice crinkle noise. other garbage you can use would be a potato chip bag.

Sandwich the layers like this... Dont forget a piece of ribbon for your mouses tail!


sew all around the outside edge making certain to catch the ribbon in a stitch.
leave one side open for turning.

now we need the mouses ears. use a wide piece of ribbon or tape to make this. its jsut a loop with the two ends laid over each other, and folded in half


Put the folded side toward the tail and tack this down.
Don't worry about how you are sewing through all three layers, that will only help you, and no one will see it.

after you get the ears on, turn your folded side in to get ready to sew the seam shut, BUT before you sew it shut fold it into a triangle so the ears are on the fold and sew the seam and the finished edge together.


Monday, October 3, 2011

Halloween shirt

I was in need of a Halloween shirt,
and my local "superstore" didn't have anything in my size
:(


SO, I found an orange shirt at my local Goodwill,
and spent the evening embroidering on it.


I think it will do the trick nicely!

Sunday, September 18, 2011

Baby shower quilt

My MIL made a quilt as a project for my baby shower.

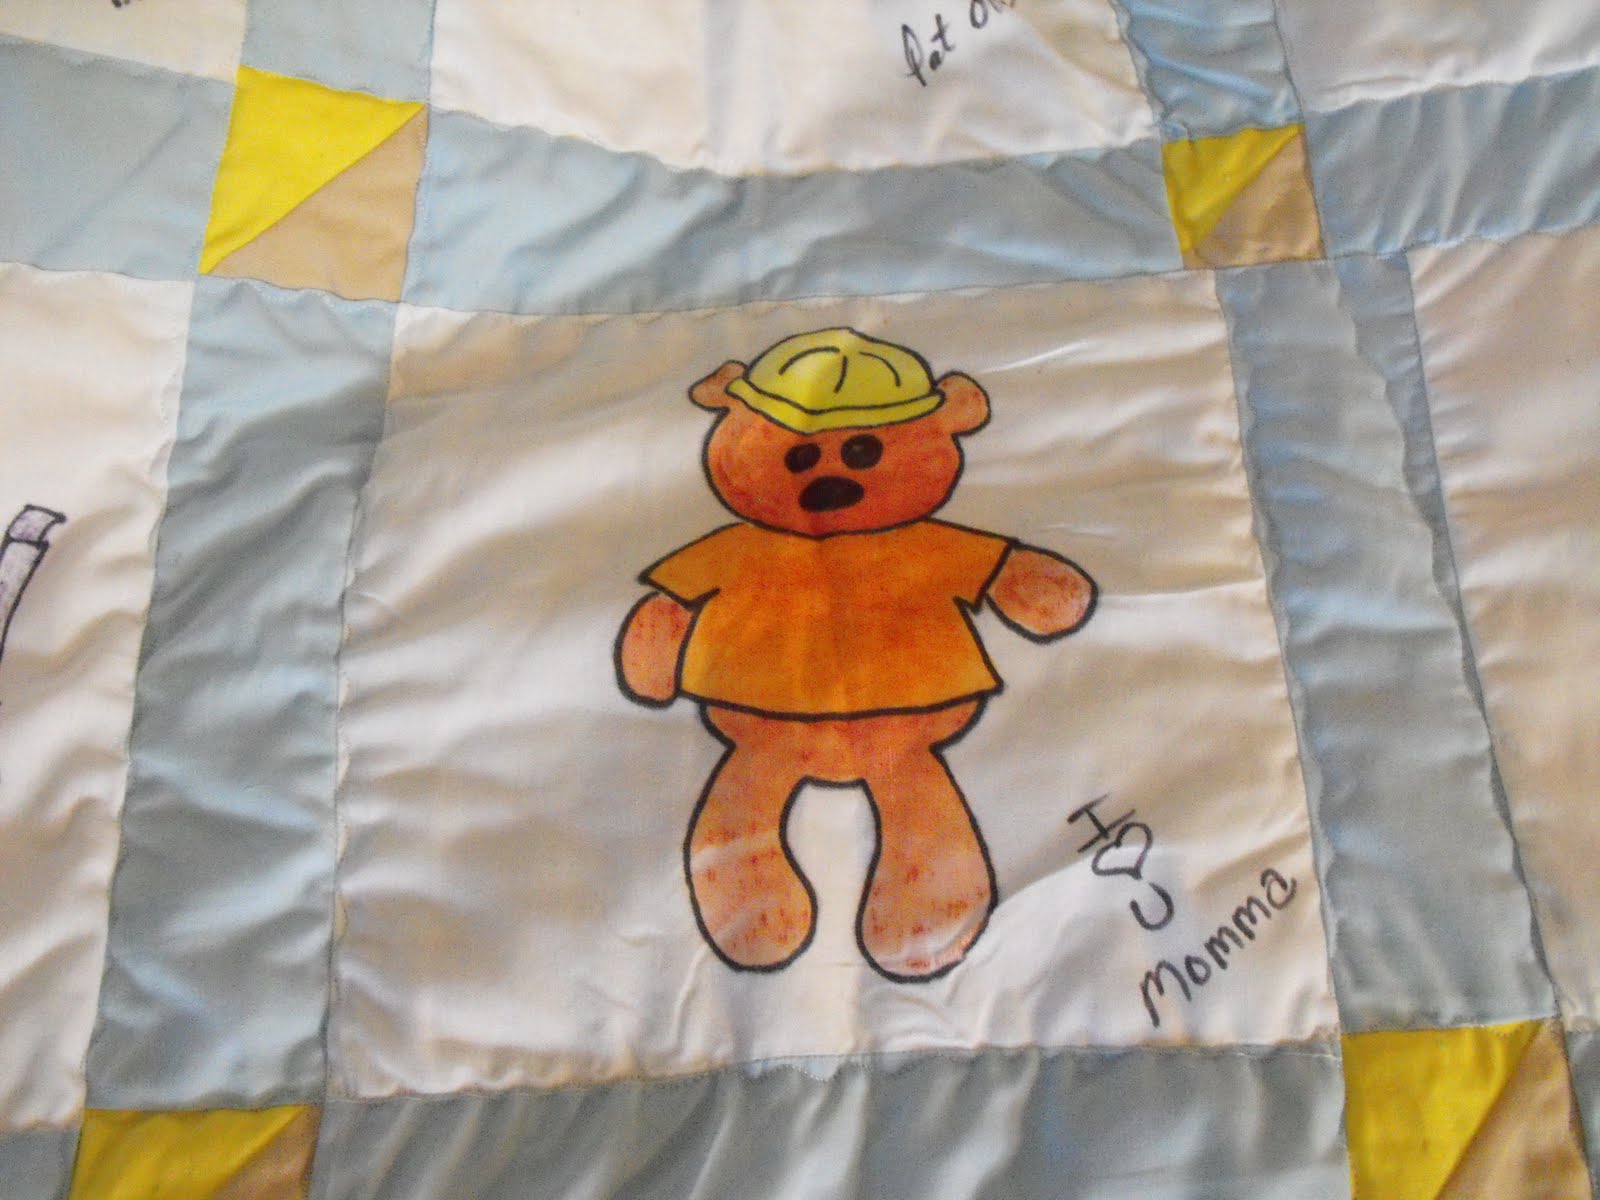
everyone had to color a color page, then we ironed them on to the blank quilt squares and outlined them with black sharpie.


I had one square left to do myself,this one was four my aunt that had recently had a stroke, so i had her sign her block, so that later i could color a picture for her and iron it on.

it took me nearly three months, but i finally got this done! (daddy had to have time to color his block too)


these are the special crayons from crayola that are designed for this project.

this is the square i did for myself. You have to press REALLY hard to get the color to iron onto the fabric.


its a wonderful memento of my shower. what a wonderful present for Matt!

Tuesday, August 2, 2011

new towels


I have been away from sewing for so long i nearly forgot how!

My Mom bought me new towels for my birthday so i now have 4 very old towels to get rid of. Well 370 posts ago, I made hair turbans for my daughter. BUT that was back in 2009, which in my world even though it was only a few years, it was a whole lifetime ago!

I made new ones out of the old towels, and i made some improvements only because i now have better equipment. My sewing machine has an overcast stitch to make finished edges with, HUGE improvement, as the last turbans frayed terribly.

I also 1970'ed these to death with some contrasting rick rack. I LOVE rick rack, my daughter umm not so much, but these are probably the last ones i will make as shes off to college most of the time and hardly ever home so these won't get much use. But I like them and the bathroom would seem wrong without a few hanging on the right hook.


After i finished the turban, a had a tad bit of towel left, so i have made hand wipe towels out of the scrap, i hang a towel over the cabinet door, and a folded towel is a lot of bulk on the door. where these should actually nearly close.

Thursday, February 3, 2011

Baby Blanket


This is the blanket I have ordered for our new arrival. (If you are unaware of whats happening check out this post....)
I LOVE the style and the colors of this but it needed a little sprucing up. So with the help of my mom and my mom-in-law I have decided to embroider on the blocks. Stay tuned for block by block finished updates!
This is going to be my craft project for a while, as ceramic painting is now a NO NO due to the lead that is in the raw Glaze paints. I know that soon I will be back at it! as it is i am chomping at the bit to get my hands back in the mud!

Thursday, August 19, 2010

Dress bag....

Alright I don't have this done yet, but this is in the works....

two weeks ago i joined a sewing group. Its just three of us that went to the same middle-school, back 100 years or so ago. We we all have so much in common we decided to start sewing together once a week.

well the first time my friend Missy told me about a blog that had made the cutest diaper bag out of a vintage dress. then later on in the week i was out thrifting with the other friend Bridge, and i saw this A-dorable dress. children's clothes we 25cents a piece so it was a no brainer...

So here is a partial tutorial on how to take this from dress to fashion bag....

I will post the rest as i get it finished....


This is the dress, it is a size 4


First i decided that i want a border of brown just above the pink waist line so i cut off the bodice. This will be the top of my bag. At this point I also sewed up the back where the dress buttoned, and tore out the sides to remove the waist bow that would have tied int he back. i saved them, they will become my purse handles .


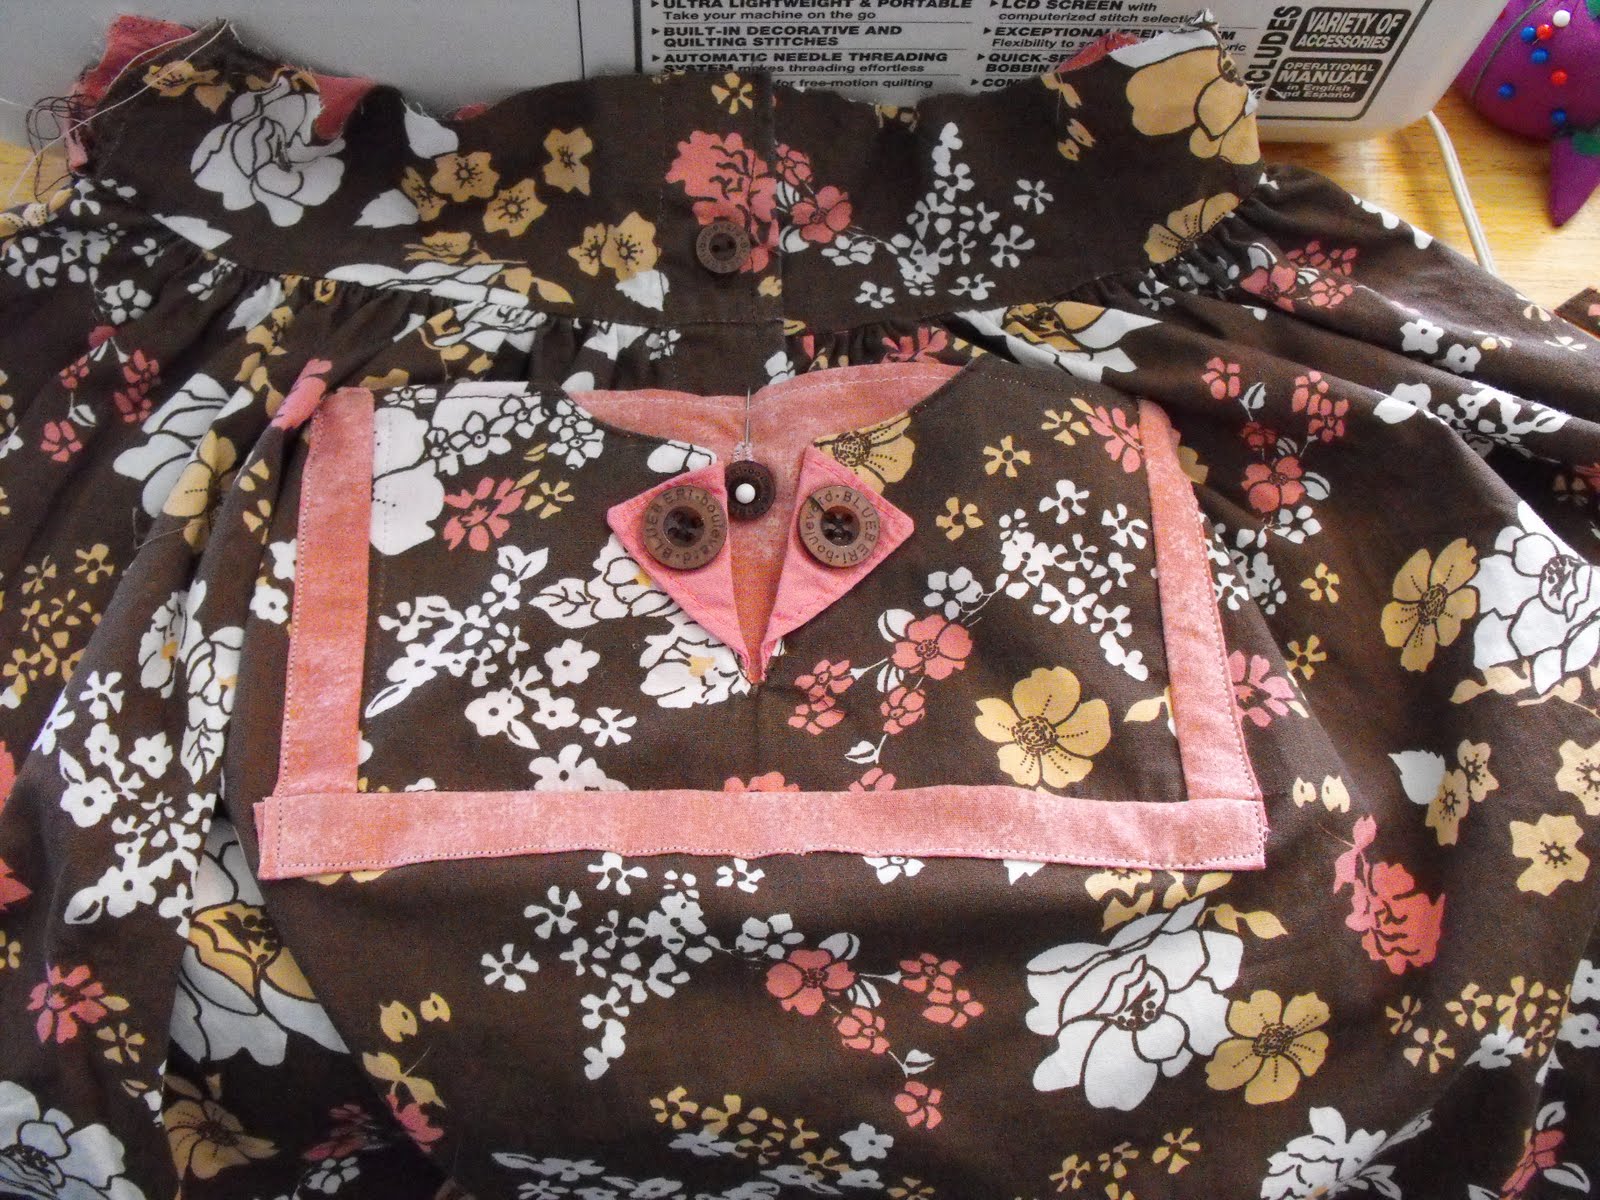
I LOVED the neckline of the dress so i didn't want that to go to waste. Missy Suggested that i use it to make a pocket. But because of the "V" neck I was afraid things might fall out of that pocket. So i took some fabric from what will be the liner of the bag and made a second pocket to put behind the front.

Incidentally, the liner of the bag is a contour sheet I bought the same day that as you can see compliments the dress quite well.


When i laid the pocket on top of the dress it didn't have the POP i wanted it just all sort of faded into the bag. So i opted to trim the pocket with more of the liner fabric. Then after (why is it always after?) I had the pocket sewn on to the back side of the bag, i noticed that due to the gathered top, the pocket gaped. So i leaned how to use my button hole maker and i just need to sew the button on where the white pin is holding it.

The button was salvaged from the back side of the bodice

My next steps are....
  1. Make the liner to fit the inside of the bag
  2. attach the handles
  3. sew the liner to the top
  4. finish the purse opening.
  5. Sew the bottom of the dress together
  6. possibly run some elastic through the hem of the dress to give it a poof.
I also have to decide on how i wish to make a closure to the bag.

Wednesday, July 7, 2010

Heat wave! (late post)


The temps here have been just horrible! in the 90's but luckily I have AC in the Living room and it keep smy kitichen fairly cool. I took some time out of my schedule, to to sew up this curtain for my front door. thats two windows down and one to go!

Tuesday, June 8, 2010

New Kitchen Curtains


Didn't they turn out great?

BTW,
they are made out of recycled sheets

Monday, June 7, 2010

BACK TO SEWING!


I moved away from sewing for a while due to some health issues that have now been resolved, and then I got busy yada yada yada. well anyhow, So last night i made these place mats to match my kitchen table cloth. neat right? ON TO THE NEW CURTAINS!

Friday, April 30, 2010

To cut or not to cut?


A childhood friend of mine brought this b-e-a-utiful piece of fabric to me on her last visit home. she felt i could be more creative with it than she could.

But, it feels so silky and wonderful, and it is so exceptionally pretty, that I simply have no idea how to use it or what to use it for, Honestly it seems like a perfect formal "wrap".

For those of you who know my pics sometimes come out w bit on the "yellow" side, the edge of the fabric is royal blue that transitions into a teal and back to royal blue on the other edge. and the design is gold thread

Tuesday, April 27, 2010

Place Mat decision


With the table cloth done, I now want to make my place mats. I am thinking about the plum as my main color, then i am going to piece in a strip of the table cloth top fabric. I have my strips all cut and ready, but i have to make up my mind on which one I like the best.


It was late when I took these shots, so once again these are far more Yellow than they REALLY are.

The lighter shade of lavender I am thinking of using as my binding.

and now that I have seen them both, I think the top one is what I will use. THAT was a cool way to decide!

Sunday, April 25, 2010

Table cloth


Well the table cloth is done. Plum on the back, my printed sheet on the front. I even tried a bit of Machine stitching in the center to keep everything in line. I like it. Next? new placemats. might take some time though... got a busy week!

Tuesday, April 20, 2010

New sheet


I found the multi colored sheet when i was thrifting two days ago, it is a queen size, and hardly faded. I walked away from it twice and i just kept drifting back to it. It has the colors of my kitchen in it. I have been itching to re paint my kitchen. but with all the work that goes into repainting something that size I am just not up to it.

So I originally bought this fabric to make a new table cloth. But then as I got to looking at it and its SIZE I thought I have enough here to make a table cloth and placemats to match. then the wheels started really turning.

With my new found quilting, I can piece this with the plum (I have nearly 8 yards of the plum) and have a table cloth with contrasting place mats, table runner, and curtains! and get rid of some fabric to boot!

Sunday, April 11, 2010

Quilt Re-thought


We decided on brown for the sashing. But i had on square that really didn't come out right, and honestly more like 3 that didn't make my "cut"

Since I am just learning quilting, I have many, many, boo boos! but i dont like to start and not finish, SOOOOO

I got on the phone with my sister and we brainstormed the morning away. at the end of it, I decided that I want this quilt to be something I am proud of. Michelle could care less, shes gonna be happy with what i hand her. or she BETTER! LOL

So I got to looking at the problem. I needed 12 blocks I only have 9 really good ones that are nearly the same size and squareness.

I had lots of the 4in "scrap" squares i had made practicing. these i finally decided to make them into my cornerstones. well taking three blocks out made this too small for a teenager. BUT.....

ADDING the small (4in) squares around the outside as well, added 8 inches back on to the quilt!

Now I wanted to see how it would all lay out and what size it would be approximately so I laid it out on my double bed....
I put the black there at the foot to help distinguish from my bedspread. I do need 4 more 4 in squares to complete the look I am going for but with the 3 squares I am discarding, I now have the material I need, and I wont just be chucking 3 blocks! I think this will be just the right size, it measures 52 inches squared. so i am thinking it should, barring anymore screw ups, measure larger than 50 inches when the top is finished. and i may still put a border around the whole thing maybe 4 or 6 inches.

Wednesday, March 31, 2010

Searcing for Sashing!


We have all of the pinwheels done for Michelle's Quilt. We have the layout planned to what you see. However we are having trouble finding a suitable sashing material. We have tried an olive green, but that makes the greens squares vanish. We have tried plum that makes the purple ones disappear.

I take the squares with me when I buy my fabric, the black picked up the design in the cream, and I liked it in the store, but we aren't certain we like the way it looks all spread out.

Does anyone have any suggestions?

Here is a close up of the color scheme in natural light....

Saturday, March 20, 2010

Quilt binding tutorial Part 2

Now that you have your binding all sewn to your quilt, we can move this to the living room, waiting room, or just anywhere you have to sit for a while becaue this part is sewn by hand.

Yes I know if you could do it on the machine it would be so much faster. But this really will Look better and seem more "professional" and not sloppy or "slacker-ish"


Something I have found that Really helps are these, Kiddie snap hair barrettes. (yes this tidbit came from my sister as well) they hold everything in place. if you dont ahve daughters that have grown out of using them like I have, then you can get them at Joannes or even hobby lobby if you are lucky enough to have one close. if you dont have one close you can check walmart if anything you can get actual barrettes, it may cost a bit more but when you figure a drive to get to the other stores that extra buck goes into your gas tank or into the barrettes right?


So what we are going to do is fold your binding over to the back side and clip it with your barrette. Do this right along the side.


Now we are going to do a "blind hem stitch" (thank you Suzie for teaching me this!) I used to do a whip stitch and it looked just awful! and took forever!

Blind hem stitch goes like this....

start off by catching both the quilt and the binding.


"skip over" some of the material by running your needle THROUGH the fold in the binding so the thread is inside. about 1/4 inch. Where you needle comes out, make a tiny stitch just like your first one where you catch the quilt and the binding.


You may find it easier to have your thread run through your quilt instead of your binding.

This is fine as well, but a word of caution! if you go THROUGH to the other side it will show on the FRONT! so be very careful NOT to do it this way!


Now at a corner, that pain in the but corner miter I made you do? Here is where it pays off!

you can see the corner is going to want to "fold" into a corner.


Tack it down with those tiny stitches.
Continue with your blind hem stitch around

When you are done, or you need to get a new peice of thread, make several small stitches to "lock" it then bury your thread inside the quilt. See how far my needle point is to the center?


See now its all done. Part 2 only took me 2 1/2 hours of steady sewing Didn't this go faster than you thought?

Now that its done that's a UFO done, you know how to do it too, and Project Linus gets another blanket. I was just told today our local hospital is accepting Project Linus blankets as well! so my blanket will go to someone that lives right here in my community!

Friday, March 19, 2010

Quilt binding tutorial Part 1

In this first post I am going to show you the easiest way to get the binding on your quilt, I will post the next part tomorrow.

My sister taught me how to do this OVER THE PHONE. Yea I know shes amazing! But since I had this UFO sitting around I thought I would do a tutorial about it just in case anyone thinks this part of quilting is the hard part. This part is probably the easiest.

This is a quilted panel I had laying around that needed binding.


First Measure your quilt to see how many inches of binding you are going to need.

Mine measure 156 inches, so I have to put two strips together to make it 160 inches long. I always used more just in case I cant add that day :)


Lay your ends together like this.
sew it diagonal like this


trim it


and it will lay like this,
so when you fold it it wont bunch up all in one place


Then you fold it in half and press it.
Yes PRESS IT! I know I hate to iron too but DO IT!


Put your raw edge of your binding to the raw edge of your quilt top. Leave a "tail" of about two inches. Start at the bottom of the quilt, but not at a corner. That will just be a big pain in the butt.


Sew to the corner and take your quilt off the machine. So that you can "Miter" the corner. Fold your binding up like this.

Now fold the binding back down. This I had to really mess with to learn but once i got the concept it was second nature. Do not try to miter without taking it off the machine. I tried to do that and it just made it harder. oh and if you are a lock stitch freak? don't do that either its just not needed.

once you get all the way around your quilt and you have mitered all of your corners you are going to be here, and wow what now?


Well we need this to have that diagonal type seam like we did when we sewed the two pieces of binding together. and this is how we do it.


Fold the end to the side, it will make a "triangle"
(I think these last two pic will make you understand how to fold it)


Tuck the "beginning" of the binding inside of the triangle.


Lay it down and sew it down

That has your binding attached to your quilt. you have sewn through all three layers the top the batting and the backing. Now this becomes a "take along" project. or a TV project. you aren't confined to do this in your sewing room any longer.